IkEv2 is the latest IPsec protocol. It addresses many of the technical problems of IPsec IKEv1, and in a dial-up scenario improves the user experience. It connects very quickly, is tolerant of variable Internet connection quality, offers more flexible authentication methods and can be allocated an IP address direct from the LAN. It is an excellent successor to L2TP.
This guide applies to any Draytek router running DrayOS. This is all the desktop models (eg 26xx and 28xx) and the new rack-mount 2910 and 3010 models, but not the 2900 or 3900 models, which ran Linux.
The good news here is that a Draytek, out-the-box, is already setup for IKEv2. Just let Draytek create the certificate, enter your usernames and passwords, and you are good to go.
The other good news is that Windows also supports IKEv2 out-the-box. Just add the cert, then add a VPN with your username and password and you are good to go. Adding the VPN is easy – its a PowerShell one-liner (although you can use the GUI if you prefer).
| Notes Dynamic IP: If the responder (router) has a dynamic IP the dial-up VPN can still work – see ‘Working with Dynamic IPs‘. 4G: if the responder (router) is 4G then dial-up VPN will not work – see ‘Working with 4G‘ |
| Notes Certificates: The Windows implementation of IKEv2 requires certificates for dial-up. This does not take long to setup – 5 minutes or so – but requires several steps. This guide describes how to do this quickly and easily so that it will work reliably. |
| Notes Encryption strength: Thanks to Jeremy Hurst for pointing out that if the router is set to Medium or High security methods then a registry key needs to be added to Windows 10/11 – see Note 2 in https://www.draytek.com/support/knowledge-base/5702 – details below |
Its worth explaining briefly how certificates work for IKEv2.
- Two certificates are involved – the IKEv2 cert on the router, and the Root CA cert that was used to sign it.
- The IKEv2 cert MUST have the same subject name as the DNS name or IP address you are using to connect the VPN.
- The IKEv2 cert needs to be trusted by your PC. Trust is enabled by installing the Root CA cert in the ‘Local Machine\Trusted Root Certificate Authorities’ cert store
- Curiously, the authentication is the reverse of what you might expect. During IKEv2 negotiation, it is the router that asks the PC to check its Trusted Root certs for the correct cert.
–
The parameters that you need for this procedure are:
- Username
- Password
- Router’s public DNS name or IP address
–
Quick start
Suitable for out-the box, or where certs have not already been setup. Scroll down for detailed instructions with screenshots.
Create the Root CA cert
- Navigate to System Maintenance/Time and Date. Ensure the time and date are correct.
- Navigate to Certificate Management/Trusted CA Certificate. Click ‘Create’
- Set Subject Alternate name to ‘none’
- Complete the subject fields. Not all need to be completed. Country, Organisation (your company name) and Common Name (eg ‘DRAYTEK ROOT CA’ will suffice
- Make sure the key size is 2048
- Click Generate. Click OK to the warning message. This takes about 15 seconds. The screen will return when complete.
- Export the cert. This will download a ‘Root CA.crt’ File on your PC.
- This cert needs to be installed on each PC that uses IKEv2. ** Admin permissions will be required **
- On a PC, double-click the .crt file. Click ‘Install’. ** Choose ‘Local Machine‘ **
- Browse to ‘Trusted Root Certification Authorities’. Click Next.
- You should see ‘The import was successful’. Now if you re-open the .crt file it should display the text ‘This certificate is intended for the following purposes’.
Create the IKEv2 cert
- Navigate to ‘Certificate Management/Local Certificate’. Click Generate
- Complete the Subject fields
- If you connect the VPN using a DNS name, choose type ‘Domain name’ and enter the FQDN
- If you connect the VPN using an IP address, choose type ‘IP Address’ and enter the IP address
- The name in the ‘Type’ field MUST match the ‘Common Name’
- Generate. After about 15 seconds, the screen will return.
- Click Sign. Type a ‘Not After’ date 825 days in the future (use Excel to calculate this). Click sign
- Navigate to ‘IPsec General Setup’ and select your cert in the dropdown
That was the difficult part!
–
Check IKEv2 on Draytek
- Navigate to ‘Remote Access Control’ and ensure ‘IPsec’ is enabled
- Navigate to ‘IPsec General Setup’ and ensure the IKEv2 cert is selected
- Navigate to ‘Remote-dial-in user’ and click an index number
- Click ‘Enable this account’
- Ensure ‘IKEv2 EAP’ is ticked
- Enter a Username and Password
- Optionally, set ‘Idle Timeout’ to 0 and disable unused protocols.
- Click OK
Setup IKEv2 VPN on Windows
- Log on as the user
- Start a PowerShell window
- type:
Add-VpnConnection -Name 'VPN' -ServerAddress '<router fqdn or IP>' -TunnelType 'IKEv2' -AuthenticationMethod 'EAP' -SplitTunneling -RememberCredential - Connect the VPN
- Type in Username and password
- Connected!
–
Detailed guide
This detailed guide includes screenshots, notes and troubleshooting information.
–
Create the Root CA cert
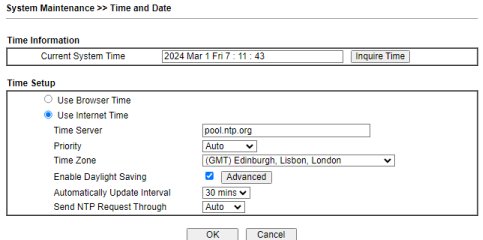
- Navigate to ‘System maintenance/Time and Date’. Ensure the time and date are correct.
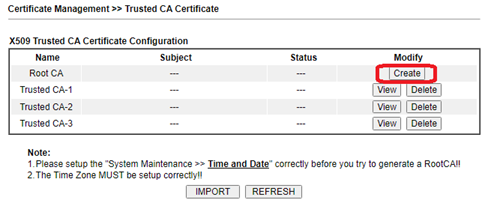
- Navigate to ‘Certificate Management/Trusted CA Certificate’. Click ‘Create’
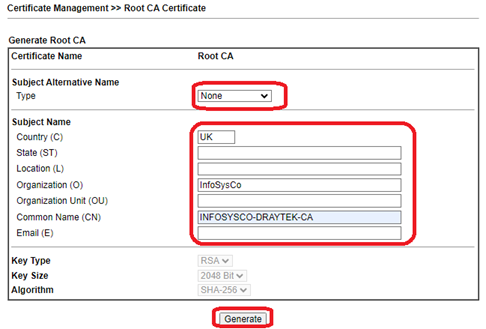
- Set ‘Subject Alternative Name’ to ‘none’
- Complete the ‘Subject Name’ fields. Not all need to be completed. Country, Organisation and Common Name will suffice
- Make sure the key size is 2048
- Generate. Click OK to the message. This takes a few seconds. The screen will return when complete.
- Click on ‘Export’. This will download a ‘Root CA.crt’ file to your PC. We will come back to this later.
- Note: This cert needs to be installed on each PC that uses IKEv2. ** Admin permissions will be required **
–
Create the IKEv2 cert
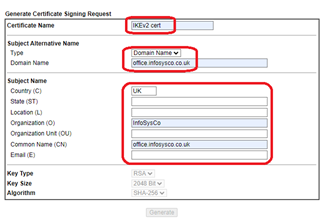
- Navigate to ‘Certificate Management/Local certificate’. Click ‘Generate’

- Name: IKEv2 cert (or anything you want)
- Complete the Subject Name fields
- If you connect the VPN using a DNS name, choose type ‘Domain name’
- If you connect the VPN using an IP address, choose type ‘IP Address’
- Important! the name in the ‘Domain name’ or ‘IP address’ field MUST MATCH the ‘Common Name’
- Click ‘Generate’
- After about 30s, the screen will return. Click ‘Sign’
- Type a ‘Not After’ date 825 days in the future (use Excel to calculate this)


- Click sign
That was the difficult part!
–
Setup IKEv2 on the router
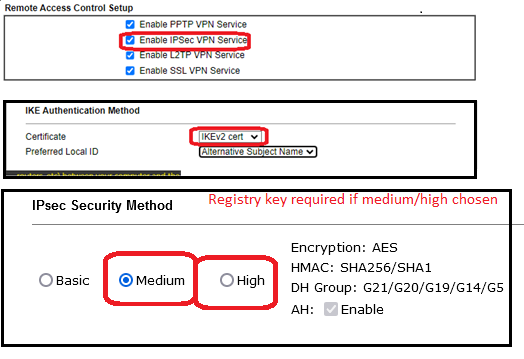
- Navigate to ‘Remote Access Control’ and ensure ‘IPsec’ is enabled
- Navigate to ‘IPsec General Setup’ and ensure the IKEv2 cert is selected.
- If ‘Medium’ or ‘High’ security is chosen a registry key will need to be added to the Windows client – see Note 2 in https://www.draytek.com/support/knowledge-base/5702. Otherwise, Windows will not try and negoiate AES with DH Group 14. Thanks to Jeremy Hurst for pointing this out.
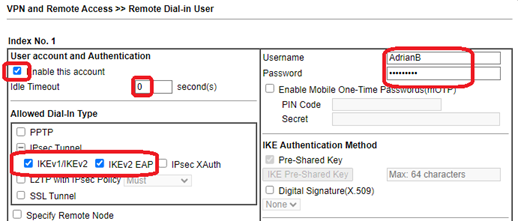
- Navigate to ‘Remote Dial-in User’ :
- Click ‘Enable this account’
- Ensure ‘IKEv2 EAP’ is ticked
- Enter a Username and Password
- Optionally, set ‘Idle Timeout’ to 0 and disable unused protocols.
- Click OK
Install Root CA cert on Windows
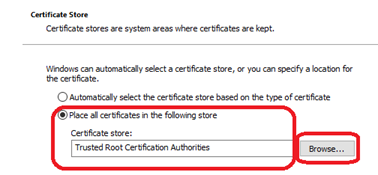
Double-click the .crt file. Click ‘Install’. ** Choose ‘Local Machine‘ **
- Browse to ‘Trusted Root Certification Authorities’. Next.
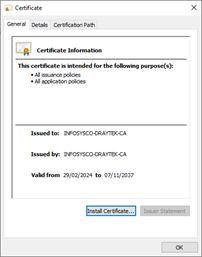
- You should see ‘The import was successful’. Now if you re-open the .crt file it should display ‘This certificate is intended for the following purposes’. This shows that your PC trusts it.
Setup IKEv2 VPN on Windows
Powershell method:
- Log on as the user
- Start a PowerShell window
- Type:
Add-VpnConnection -Name 'VPN' -ServerAddress '<router fqdn or IP>' -TunnelType 'IKEv2' -AuthenticationMethod 'EAP' -SplitTunneling -RememberCredential
For a systemwide VPN simply add ‘-AllUserConnection’ to the above command line, and paste it into an administrator powershell window.
Then,
- Connect the VPN
- Type in Username and password
You are connected!
–
Troubleshooting
The stages in the connection process are:
- Windows initiates a connection to the Draytek by sending the initial packet. If the Draytek is happy with the security parameters, negotiations continue
- Draytek requests Windows for all(!) its Root CA certificates. Windows sends the certs from its Trusted Root Authorities store back to Draytek (this has implications for fragmentation,see note below)
- The username/password is authenticated by the router using EAP/MS-CHAP2
- An IP address is allocated to the Windows client
| Note on fragmentation: When the Draytek requests the root certs from Windows, the response is too large for 1 network packet. The IP protocol will break large packets into smaller ones, but this upsets IKEv2 security and the VPN will not connect. To get around this, IKEv2 is smart enough to break down the data before it reaches IP, preventing IP from fragmenting. This is fine as long as both ends support IKEv2 fragmentation. Some older routers do support IKEv2, but not IKEv2 fragmentation. S2S VPNs work, but dial-in VPNs do not. |
Troubleshoot by observation
| Error | Cause |
|---|---|
The connection jumps to ‘verifying your sign in’ then displays “The network connection between your computer and the VPN server…”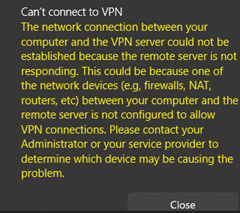 | Windows is not getting a response from the router. IPsec is not enabled on the router or the FQDN/IP address in the Windows VPN is wrong. – Check, then use logging to look for the initial packet and subsequent negotiations. |
The connection attempts fails with “IKE authentication credentials are unacceptable”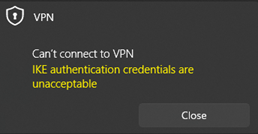 | Certificate error. Your PC does not have a copy of the Root CA cert that signed the IKEv2 cert – or – the subject name in the IKEv2 certs does not match the servername in the Windows VPN – Run ‘certlm.msc’ on the computer and look in the Trusted Root Authority store. Find the cert, open it and check for the ‘Certificate is intended for…’ text. View the IKEv2 cert in the router. Check that the Issuer is the Root CA, and that subject matches the router address. You could copy the text to a Windows .cer file and open it with CryptoShell Extensions. You can then verify that it is a trusted child of the trusted Root CA cert.  |
Waits for a long time on ‘verifying your sign-in info’ then fails with “The context has expired and can no longer be used” | Wrong username or password. |
Troubleshoot by examining logs
A ‘good’ connection contains the following lines, working upwards from the initial packet at the bottom. NB several lines have been removed for readability:
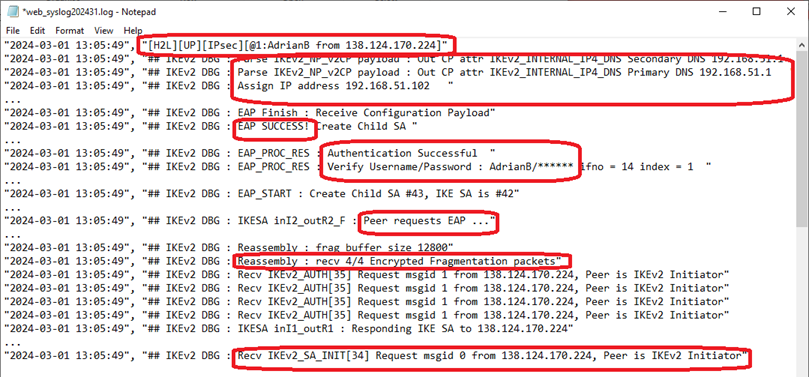
Note the lines of interest:
- ‘Recv IKEv2_SA_INIT[34]’ – the initial packet
- ‘Reassembly’ – IKEv2 is reassembling the 4 packets containing the list of trusted certs from Windows
- ‘Peer requests EAP’ – the router recognises that Windows is offering EAP authentication
- ‘Verifying username/password’, ‘authentication successful’ and ‘EAP success’ – user has successfully authenticated
- ‘Assign IP address’ – IPs being assigned
- ‘[H2L][UP][IPSEC]’ – the connection is complete.