The good news here is that a Draytek, out-the-box, is already setup for PPTP. Just add your usernames/passwords, and you are good to go.
The other good news is that Windows also supports PPTP out-of-box. Just add a VPN with your username and password and you are good to go. Adding the VPN is easy – its a PowerShell one-liner (although you can use the GUI if you prefer).
–
This guide applies to any Draytek router running DrayOS. This is all the desktop models (eg 26xx and 28xx) and the new rack-mount 2910 and 3010 models, but not the 2900 or 3900 models, which ran Linux.
The parameters that you need for this procedure are:
- Username
- Password
- Router’s WAN FQDN (or IP address)
–
Quick start
On the router:
- Log in
- Navigate to ‘VPN and Remote access/Remote Dial-in User’
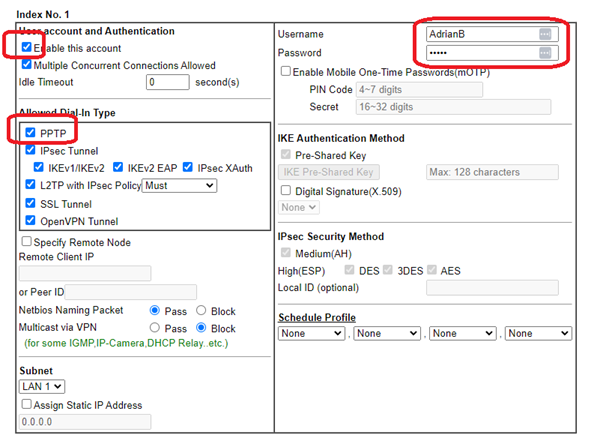
- Click on an index number. Tick enable Type the username and password. Click OK.
On the Windows PC:
- Log on as the user
- Start a PowerShell window
- type:
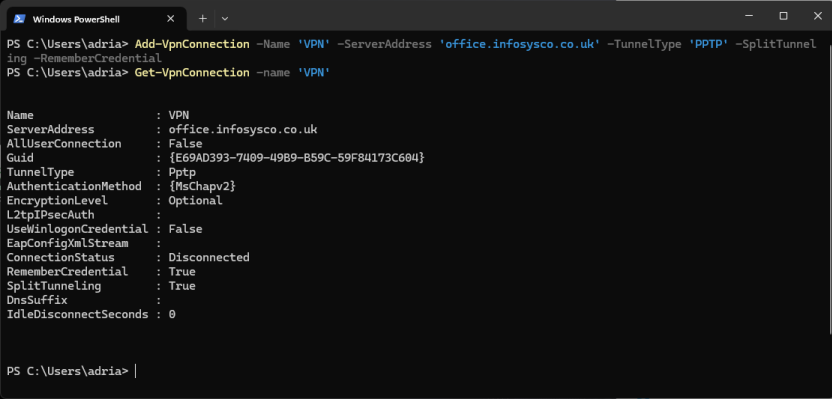
Add-VpnConnection -Name 'VPN' -ServerAddress '<router fqdn or IP>' -TunnelType 'PPTP' -SplitTunneling -RememberCredential
- Connect the VPN
- Type in username and password
- Complete!

–
Detailed guide
This detailed guide includes screenshots, notes and troubleshooting information.
| Note: Notes are presented in a bordered box like this |
| 4G: A dial-up VPN needs to connect to the WAN interface of your router, so your router will need to have a public routable IP on the WAN interface. 4G is NATed by the service provider so you cannot connect to the WAN interface of the router directly (unless you have a 4G SIM with fixed public IP). |
| Dynamic IP: If the routers public IP is dynamic, you will need to assign a DynDns name to it – see the [not written yet] Draytek-DynDns post for details. However, if the IP does not change very often, and you are keen to get going, you can make a note of what it is now and use it temporarily until it changes. |
–
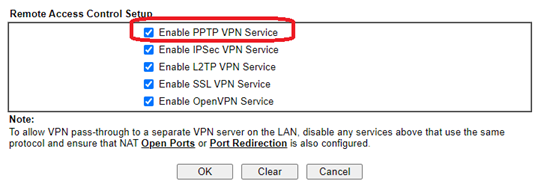
Enable the PPTP service
This is enabled by default on older routers, but not on newer. If it has been disabled, click to re-enable (requires a router reboot).
–
Setup PPP, including DHCP
When the user connects, it is PPP that authenticates the user, sets the encryption and assigns an IP address to the VPN. The default Draytek and Windows security settings work out-the-box to give the best security, and so there should be no need to change settings here. More info on how PPP works with Windows can be found in ‘Draytek-PPP-General‘, but it is worth looking at DHCP here.
When the user connects, they will need an IP address from the LAN they are dialling into. Draytek have several ways of dealing with this:
- If DHCP is enabled on the router LAN, PPP will use that to assign an IP
- If DHCP is not enabled, PPP can assign an IP from its own ‘pool’ of addresses
- The user can be assigned a fixed IP address – see ‘setting up user’ below
No 1 is the easiest, and is the default. No 2 is also enabled by default, and will kick in if you disable DHCP on the LAN. No 3 is a property of the user’s VPN profile, and can be used without disabling 1 or 2.
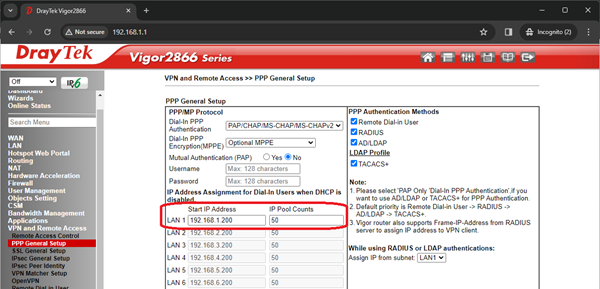
Here, the router will assign 50 addresses from 192.168.1.200 to 192.168.1.249 if DHCP on the LAN is disabled. You just need to make sure these will not clash with existing IPs or the DHCP range on your LAN.
–
Setup the user
The only actions that are required are to tick enable, enter username and password, and ensure PPTP is allowed. By default ‘PPTP’ is already ticked on older routers (but not on on later routers).
The username will identify who is connected, so would usually be related to their ‘real’ name, eg ‘ABromley’. Both username and password could be different from the user’s Windows password – so if one is hacked, the other is not. The password could be long and/or complicated, as it can be remembered by Windows and the user may never see it or type it in (if you type it in for them when setting up their VPN).
A static IP can be assigned if you wish. Sometimes this is useful if DHCP is not used, or as a means of identifying which VPN is generating network traffic when using Wireshark. The IP must, of course, be taken from the router’s LAN subnet. You could also:
- change idle timeout to 0 seconds (so if the user leaves their computer for a while the VPN will not drop)
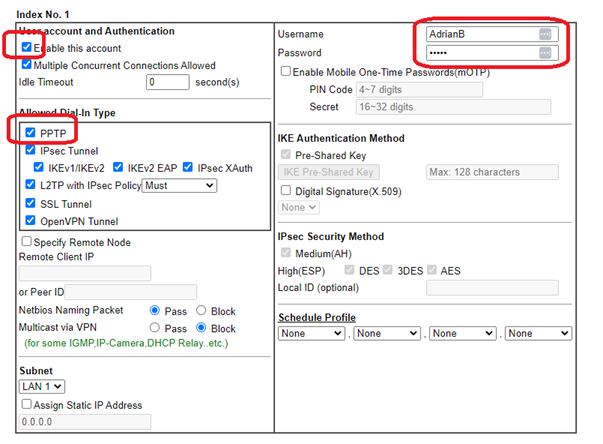
We will look at some of the other options and features later. For now, that completes the router setup. We can now turn our attention to the Windows client.
—
Windows
The procedure for Windows 10/11 is very similar (if not identical). The VPN can be created using the GUI, by using Powershell (or a batch file that calls Powershell) or by Group Policy.
Windows VPNs can be system-wide – where the VPN is available to any user who logs on to that PC, or per-user – where the VPN is only available to that user. Which you choose depends on whether you want a VPN available to all users who logon the the PC, or just named users.
Its also worth thinking about whether you want to use ‘Split Tunnelling’. If the VPN is connected with Split Tunnelling enabled, ONLY network traffic for the remote network is sent over the VPN. General Internet traffic (web browsing etc) from your PC is NOT passed over the VPN and exits by the usual route – over wireless to your home router, for example. Split Tunnelling sounds normal and it is probably what you want; but it is not the default in Windows. Windows will, by default, send even your Internet traffic over the VPN to exit to the Internet via the remote router.
Why would you ever NOT choose split tunnelling? There are a few reasons – you may want your users Internet traffic filtered by your Office firewall, for example. Or, you may have a network with several subnets behind the VPN router. Or, in the case of dialling-in to a pfSense router, it is sometimes just easier.
Setup the VPN – PowerShell method
This method is by far the easiest.
For a per-user VPN, copy this command into notepad. Edit it with your own name, fqdn/IP and PSK, then copy it into a non-administrator PowerShell window:
Add-VpnConnection -Name 'VPN' -ServerAddress '<fqdn or IP>' -TunnelType 'PPTP' -SplitTunneling -RememberCredential…note how split tunneling is enabled using this method.
System-wide VPN
…simply add ‘-AllUserConnection’ to the above command line, and paste it into an administrator powershell window.
Setup the VPN – GUI method
This procedure sets up a per-user VPN. Setting up a system-wide VPN requires a different starting point – see below.
Click Start/Settings/Network and Internet/VPN/Add a VPN. Complete the settings. Most should be self-explanatory,
- Server name or address: is the public IP of your VPN router. Either fqdn or IP can be used
- Username and Password: Type the password here and leave ‘remember my sign-in’ ticked. The user will not be prompted for credentials.
That should now connect – but will not have split tunnelling enabled. Your Internet traffic will be sent over the VPN.
- Right-click the Windows Start button, Network Connections.
- Win 10: Scroll down to ‘Change adapter options’.
- Win 11: Click into ‘VPN’, find your VPN, click the down arrow, click on ‘advanced options’, click edit against ‘more VPN options’.
or, in the Windows search box type ‘ncpa.cpl’ and click on the ‘Control Panel Item’.
Then,
- Right-click your VPN connection and open Properties.
- In the Networking tab, select Internet Protocol Version 4 (TCP/IPv4).
- Click Advanced.
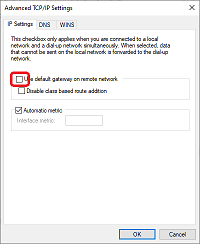
- In the General tab, click Advanced.
- Disable Use default gateway on remote network.
- Restart your VPN connection.
System-wide VPN
- Right-click the Windows Start button and go to Network Connections.
- Scroll down to Network and Sharing Centre
- Setup a Connection or Network
- Connect to a workplace
- No, Create a new connection
- Use my Internet Connect (VPN)
- Enter server IP or FQDN, give it a name, and tick ‘allow other people to connect’.
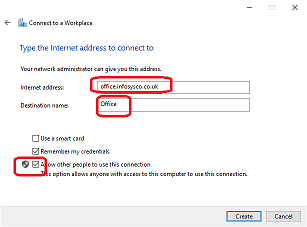
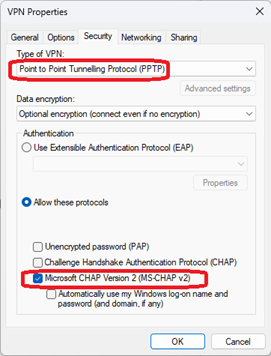
That will create the VPN. You will need to manually set the type to PPTP, and set authentication to MS-CHAPv2 by running ‘ncpa.cpl’ and editing the connection:
Split tunneling can be enabled the same way as described above.
—
Troubleshooting
VPN connections can be quite difficult to troubleshoot, mainly because of the lack of logging and the meaningless error messages at the Windows end. Draytek logging is OK but needs a bit of interpretation.
What could go wrong with PPTP? If it doesn’t connect, check:
- Is the IP or FQDN correct?
- Is PPTP enabled both in ‘Remote Access Control’ and in the user profile?
An incorrect username/password will be self-evident – Windows will prompt
You may want to see evidence that the connection attempts making it to the Draytek, To check this, look at the logs in the Draytek:
- Diagnostics/Syslog Explorer
- ‘Web Syslog’ tab
- Tick ‘Enable web syslog’
- Syslog type: VPN
- Display mode: always record the new event (you will need to refresh regularly)
- Export if you wish.
The exported log will look similar to this

Note ‘PPP Start(), ‘CHAP Login OK’ and IP addresses being allocated.