Sometimes, one of the WAN interfaces involved in a VPN has a dynamic IP address – that is an IP addresses that changes every so often. This causes a problem for VPNs because the DNS name or IP address is hard-coded into the configuration.
| Notes Initiator is the device that starts the VPN connection. This will be the user device (eg Windows) in a dial-up scenario, or one of the routers in a site-to-site scenario. Responder is the device that receives the connection request (usually a router in either scenario). |
If the dynamic IP is at the initiator (either the user’s device or one of the routers) then this may not matter. If it is the responder (router) end then this presents a problem. The initiator has the IP address or domain name hard-coded into its configuration. When the responder IP address changes, then the connection will fail.
How to get around this? The answer is to subscribe to a service that provides a domain name that accurately resolves to the correct IP address, even after that address has changed. The resulting dynamic DNS (DDNS) name will usually be from one of the providers domains – eg ‘infosysco-office.ddnsfree.com’.
How does it work? Some software (usually built-in to the router) monitors the routers public IP address. It connects to the DDNS service provider and updates the DNS record with when the IP changes. The DNS record has a low timeout – 60 to 120 seconds typically – so connecting devices need to keep re-checking. This means that when it changes, the device very quickly has the new correct IP and the VPN continues to work.
The public IP address can also be learned by the router sending out a test packet to the service provider. From this, the provider can determine the public IP that the packet was sent from and update the DNS record accordingly.
If the router does not have any DDNS functionality built-in, or you wish to use a third-party service, then most DDNS providers have a software agent that can be run on a computer on the LAN. It uses the test packet method described above to keep the DNS record updated.
The DDNS service may be provided by the router manufacturer or by a third party such as Dynu.com. Some providers offer a free service for small numbers of hosts, or the router manufacturer may give you free service for a while.
–
Dynamic DNS on Draytek
Once again, Draytek make it easy. Their routers have DDNS update functionality built-in. They support many third-party providers as well as their own domain: drayddns.com. Dynu is a popular third-party provider, allowing 4 free hostnames, and will be used in this walkthrough.
Using Dynu.com
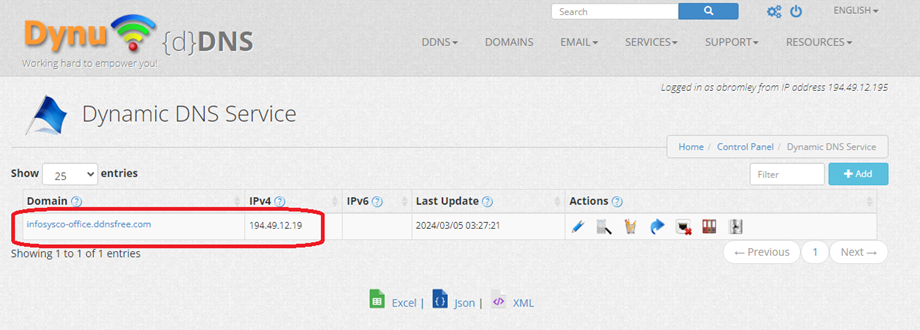
Firstly, create a Dynu account. Then add a hostname. The DNS record will initially be set with the public IP from your computer.

On the Draytek,
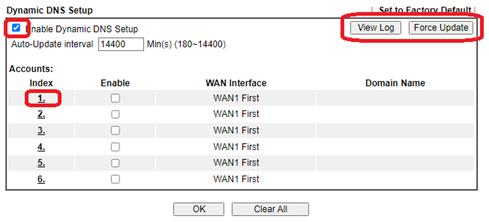
- navigate to Applications/Dynamic DNS setup. Note the View Log and Force Update buttons – we will come back to these later.

- Tick Enable, and click on an index number
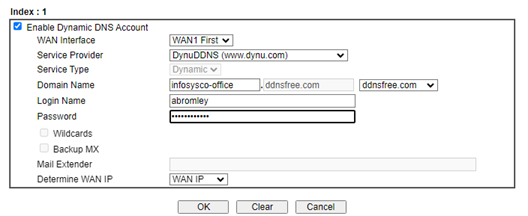
- Tick Enable again, and complete:

- WAN interface: this is the interface whose public IP is being updated. If you have just 1 interface, then this can be left at default. Otherwise, see the note below.
- Service provider: Select your provider from the drop-down
- Domain name: Draytek cleverly knows which provider owns which domain names. Select your provider’s domain from the drop-down on the right, then add your hostname on the left
- Login name/password: the credentials of your account in Dynu.
- Determine WAN IP: This defines whether the actual WAN IP address is used, or whether a test packet is sent to Dynu who reply with what it believes to be your public IP. Usually, this can be left as ‘WAN IP’ unless the connection is 4G – see ‘Working with 4G‘ for details
| Notes WAN interface: Your Draytek may have multiple active WAN interfaces (say one for the main fibre connection and another for ADSL backup) so you need to be clear which IP address is going to be updated. You can specify ‘WANx First’ or ‘WANx Only’. If set to ‘WANx First’ the Draytek will start with this one, moving on to the next on failure. If set to ‘WANx Only’ it will only try this one. So, if you have only 1 active WAN interface, it could be set as ‘WANx only’ . |
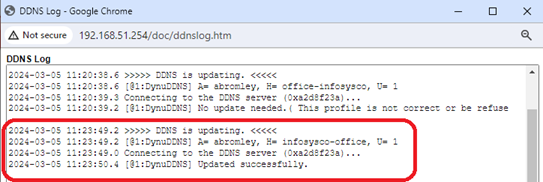
- Return to the previous screen and click ‘View Log’. Look for ‘Updated Successfully’ (note my error on the first attempt!)

- Test with an nslookup to the DNS name:
